


Deploying Mx Space + Shiro with Nginx Proxy Manager Reverse Proxy
Deploying Mx Space + Shiro with Nginx Proxy Manager Reverse Proxy
Introduction
Mix Space is a simple yet powerful personal blog system — fast, modern, and clean. You can use it to build your own personal space, record your life, and share knowledge.
This tutorial uses Nginx Proxy Manager to reverse-proxy both frontend and backend.
- Frontend domain:
zinzin.top - Backend domain:
mx.zinzin.top
Prerequisites
You’ll need the following:
- A server (Linux kernel version > 4.18, RAM > 1GiB; this tutorial uses Debian 11)
- A domain name mapped to your server’s IP
- Docker installed
Install Nginx Proxy Manager
-
Create a
docker-compose.ymlfile in any directory:services:app:image: 'jc21/nginx-proxy-manager:latest'restart: unless-stoppedports:- '80:80'- '81:81'- '443:443'volumes:- ./data:/data- ./letsencrypt:/etc/letsencrypt -
Save the file and start the service:
Terminal window docker-compose up -d# Ordocker compose up -d -
If you’re a first-time user, refer to these guides:
Deploy the Backend
-
Pull the configuration file:
Terminal window cd && mkdir -p mx-space/core && cd $_# Download docker-compose.ymlwget https://fastly.jsdelivr.net/gh/mx-space/core@master/docker-compose.yml -
Edit the
environmentfields indocker-compose.yml:- JWT_SECRET: A string of 16 to 32 characters used to encrypt user JWTs.
- ALLOWED_ORIGINS: Usually the frontend domain; separate multiple domains with commas.
- ENCRYPT_ENABLE: Change
falsetotrueif encryption is needed, and fill in the encryption key. - ENCRYPT_KEY: Must be 64 characters long.
-
Here’s an example configuration — set the JWT secret and allowed domains according to your own setup:
services:app:container_name: mx-serverimage: innei/mx-server:latestenvironment:- TZ=Asia/Shanghai- NODE_ENV=production- DB_HOST=mongo- REDIS_HOST=redis- ALLOWED_ORIGINS=zinzin.top- JWT_SECRET=Yy14003252791400325279volumes:- ./data/mx-space:/root/.mx-spaceports:- '2333:2333'depends_on:- mongo- redisnetworks:- mx-spacerestart: unless-stoppedhealthcheck:test: ['CMD', 'curl', '-f', 'http://127.0.0.1:2333/api/v2/ping']interval: 1m30stimeout: 30sretries: 5start_period: 30smongo:container_name: mongoimage: mongovolumes:- ./data/db:/data/dbnetworks:- mx-spacerestart: unless-stoppedredis:image: redis:alpinecontainer_name: redisvolumes:- ./data/redis:/datahealthcheck:test: ['CMD-SHELL', 'redis-cli ping | grep PONG']start_period: 20sinterval: 30sretries: 5timeout: 3snetworks:- mx-spacerestart: unless-stoppednetworks:mx-space:driver: bridge -
Start the backend service:
Terminal window docker-compose up -d# Ordocker compose up -d -
Once done, you’ll see a screen like this:

core setup complete
Reverse Proxy the Mx Space Backend with Nginx Proxy Manager
-
Open the Nginx Proxy Manager admin panel and follow these steps:

nginx step 1 
nginx step 2 Note: On servers in mainland China, automatic certificate issuance may fail due to network issues. Try a few times, or upload a certificate manually.
-
After it succeeds, visit
https://mx.zinzin.top/proxy/qaqdminfor initial setup:
initial backend setup page -
The admin panel after successful deployment:

backend admin panel
Deploy the Shiro Frontend
1. Configure the Theme
-
In the admin panel, go to “Extras – Config & Cloud Functions” and fill in the following:
- Name:
shiro - Reference:
theme - Data type:
JSON - Data: See the JSON config below.
json
{"footer": {"otherInfo": {"date": "2020-{{now}}","icp": {"text": "萌 ICP 备 20236136 号","link": "https://icp.gov.moe/?keyword=20236136"}},"linkSections": [{"name": "About","links": [{"name": "About this site","href": "/about-site"},{"name": "About me","href": "/about"},{"name": "About this project","href": "https://github.com/innei/Shiro","external": true}]},{"name": "More","links": [{"name": "Timeline","href": "/timeline"},{"name": "Friends","href": "/friends"},{"name": "Monitor","href": "https://status.innei.in/status/main","external": true}]},{"name": "Contact","links": [{"name": "Leave a message","href": "/message"},{"name": "Send email","external": true},{"name": "GitHub","href": "https://github.com/innei","external": true}]}]},"config": {"color": {"light": ["#33A6B8","#FF6666","#26A69A","#fb7287","#69a6cc","#F11A7B","#78C1F3","#FF6666","#7ACDF6"],"dark": ["#F596AA","#A0A7D4","#ff7b7b","#99D8CF","#838BC6","#FFE5AD","#9BE8D8","#A1CCD1","#EAAEBA"]},"bg": ["https://github.com/Innei/static/blob/master/images/F0q8mwwaIAEtird.jpeg?raw=true","https://github.com/Innei/static/blob/master/images/IMG_2111.jpeg.webp.jpg?raw=true"],"custom": {"css": [],"styles": [],"js": [],"scripts": []},"site": {"favicon": "/innei.svg","faviconDark": "/innei-dark.svg"},"hero": {"title": {"template": [{"type": "h1","text": "Hi, I'm ","class": "font-light text-4xl"},{"type": "h1","text": "Innei","class": "font-medium mx-2 text-4xl"},{"type": "h1","text": "👋。","class": "font-light text-4xl"},{"type": "br"},{"type": "h1","text": "A NodeJS Full Stack ","class": "font-light text-4xl"},{"type": "code","text": "<Developer />","class": "font-medium mx-2 text-3xl rounded p-1 bg-gray-200 dark:bg-gray-800/0 hover:dark:bg-gray-800/100 bg-opacity-0 hover:bg-opacity-100 transition-background duration-200"},{"type": "span","class": "inline-block w-[1px] h-8 -bottom-2 relative bg-gray-800/80 dark:bg-gray-200/80 opacity-0 group-hover:opacity-100 transition-opacity duration-200 group-hover:animation-blink"}]},"description": "An independent developer coding with love."},"module": {"activity": {"enable": true,"endpoint": "/fn/ps/update"},"donate": {"enable": true,"link": "https://afdian.net/@Innei","qrcode": ["https://cdn.jsdelivr.net/gh/Innei/img-bed@master/20191211132347.png","https://cdn.innei.ren/bed/2023/0424213144.png"]},"bilibili": {"liveId": 1434499}}}}
theme configuration Tip: For detailed configuration, refer to the official docs: Config Options.
- Name:
2. Deploy Shiro with Docker Compose
-
Create and enter the
shirodirectory:Terminal window mkdir shirocd shiro -
Download the required files:
Terminal window wget https://raw.githubusercontent.com/Innei/Shiro/main/docker-compose.ymlwget https://raw.githubusercontent.com/Innei/Shiro/main/.env.templatemv .env.template .env -
Update the backend URL in the
.envfile:Terminal window vim .env # Edit your ENV variables
set the backend URL in env After saving, start the service:
Terminal window docker compose up -d# Ordocker-compose up -d -
To update the image later:
Terminal window docker compose pull
3. Reverse Proxy Shiro with Nginx Proxy Manager
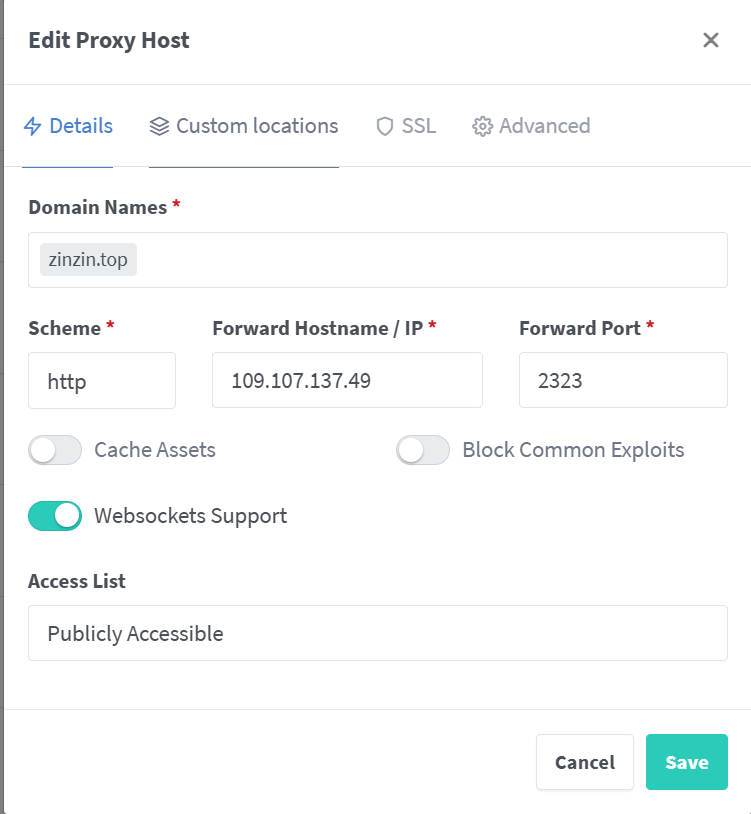
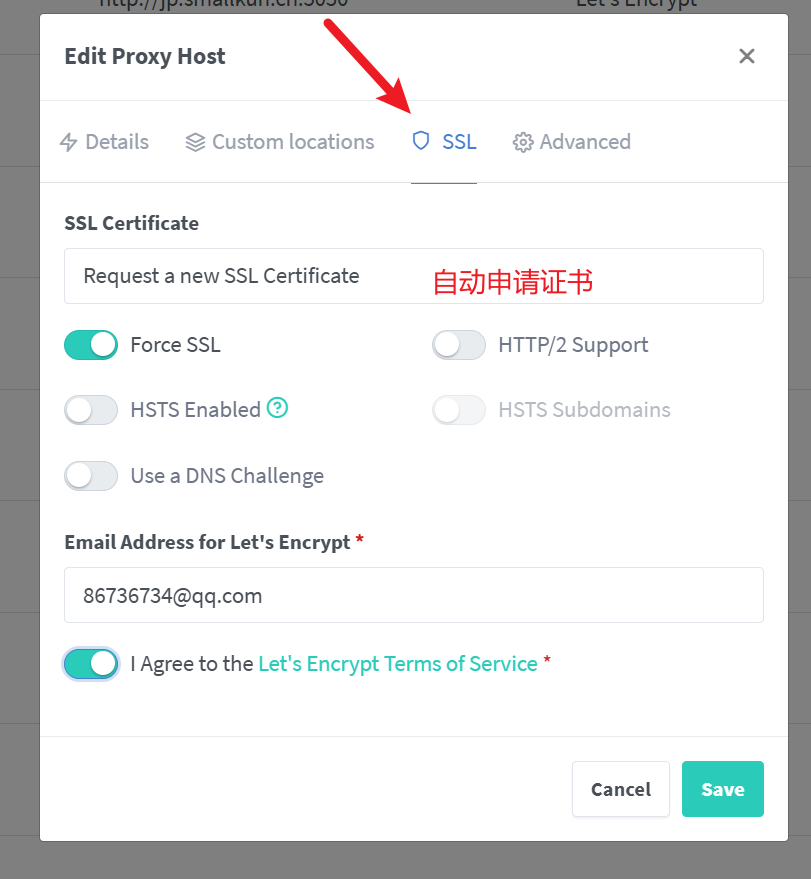
Follow the prompts to configure the reverse proxy. If all services run on the same machine, you can use internal IP addresses directly.
Access the Main Site
Once everything is deployed, visit https://zinzin.top to see the main site:
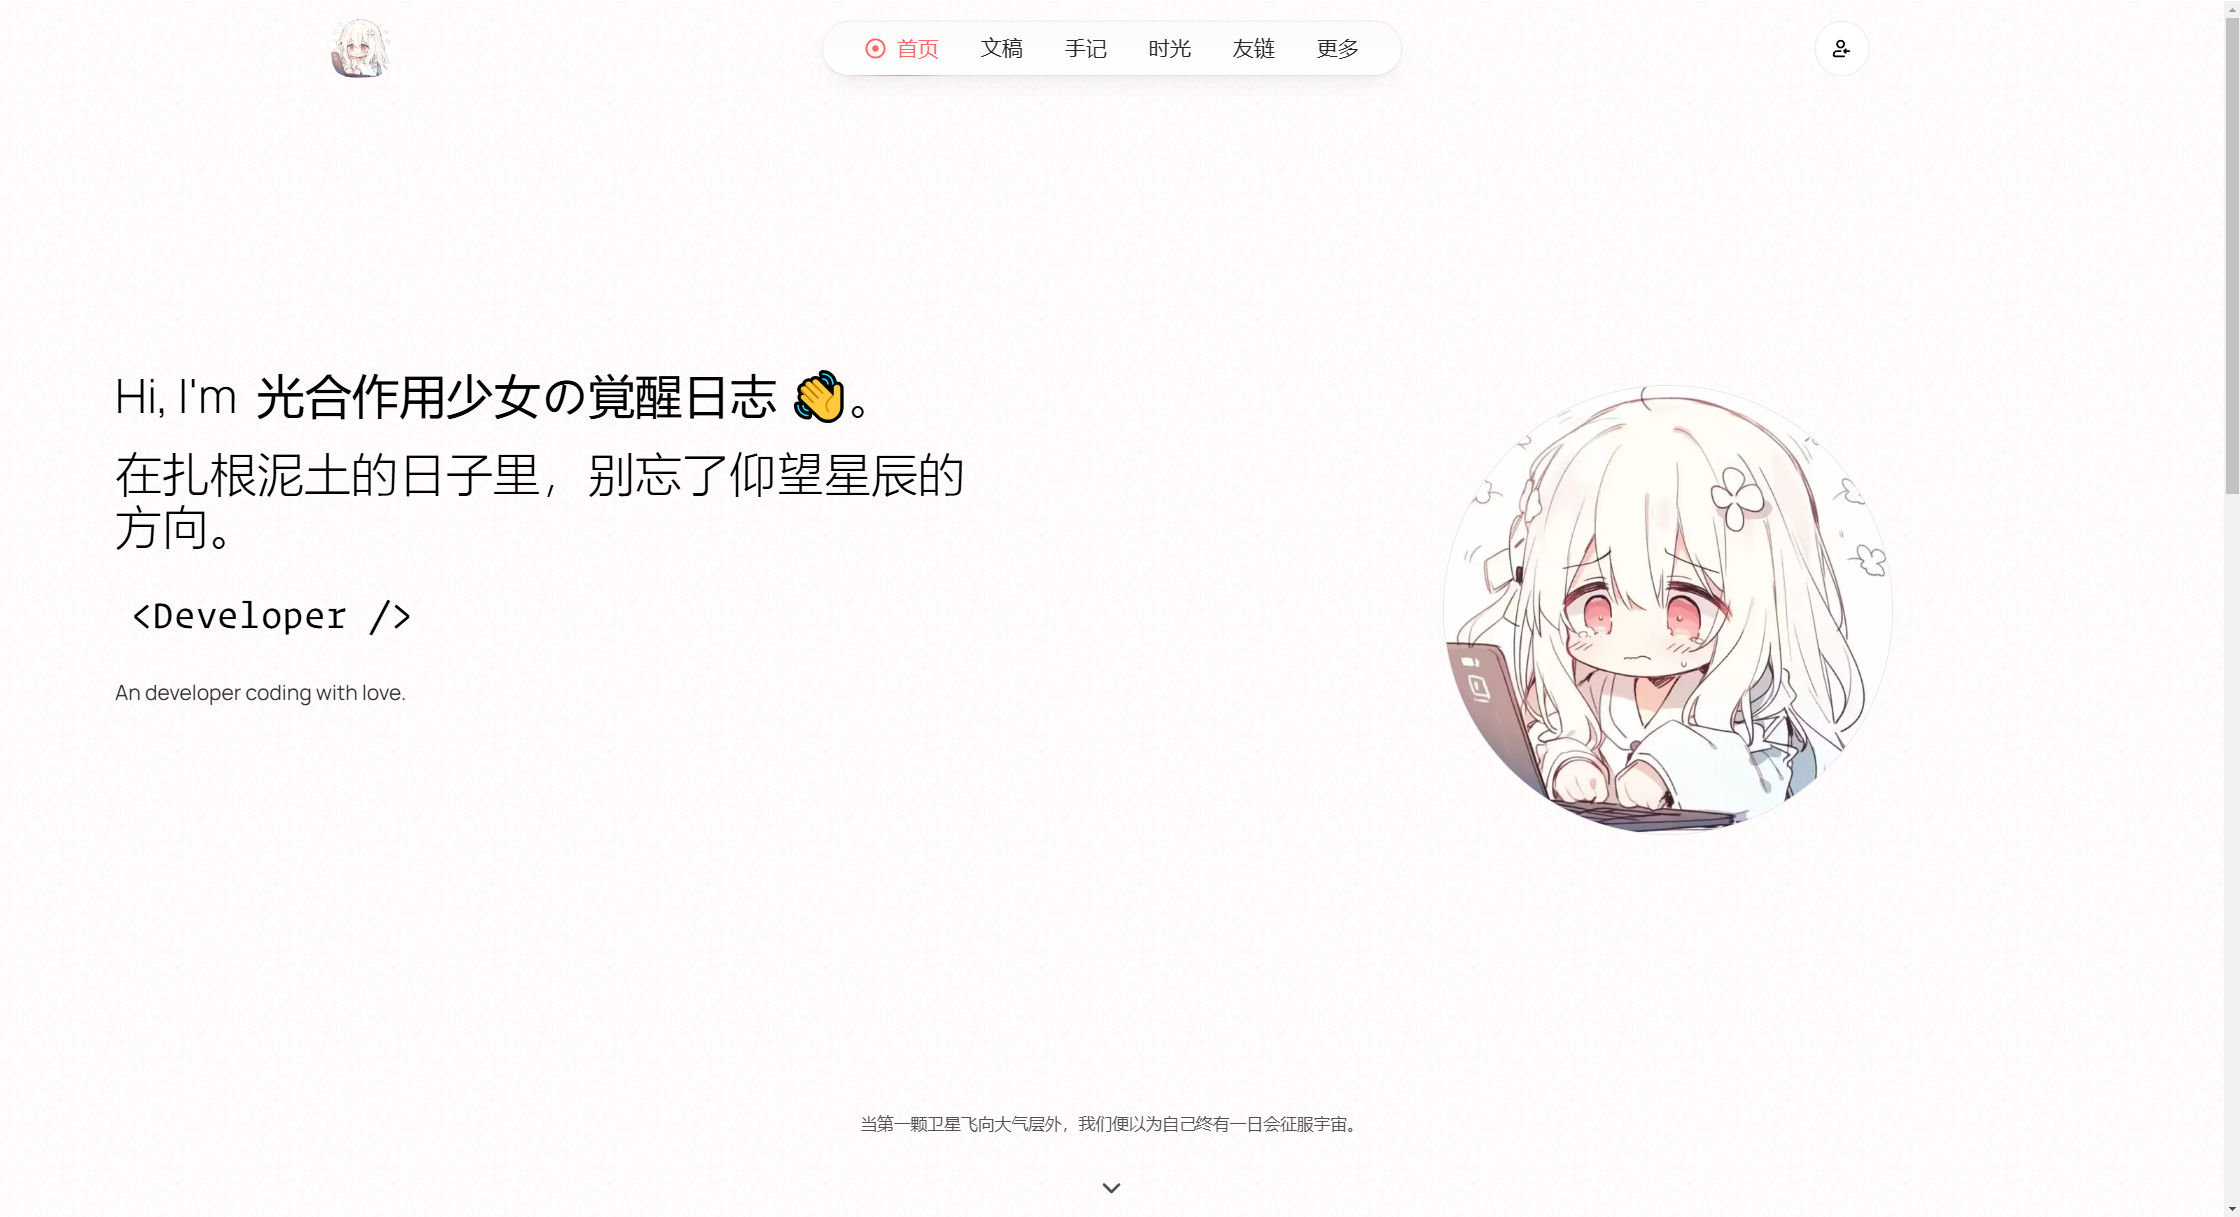
Done!!
If you run into other issues during deployment, check the community:
Notes
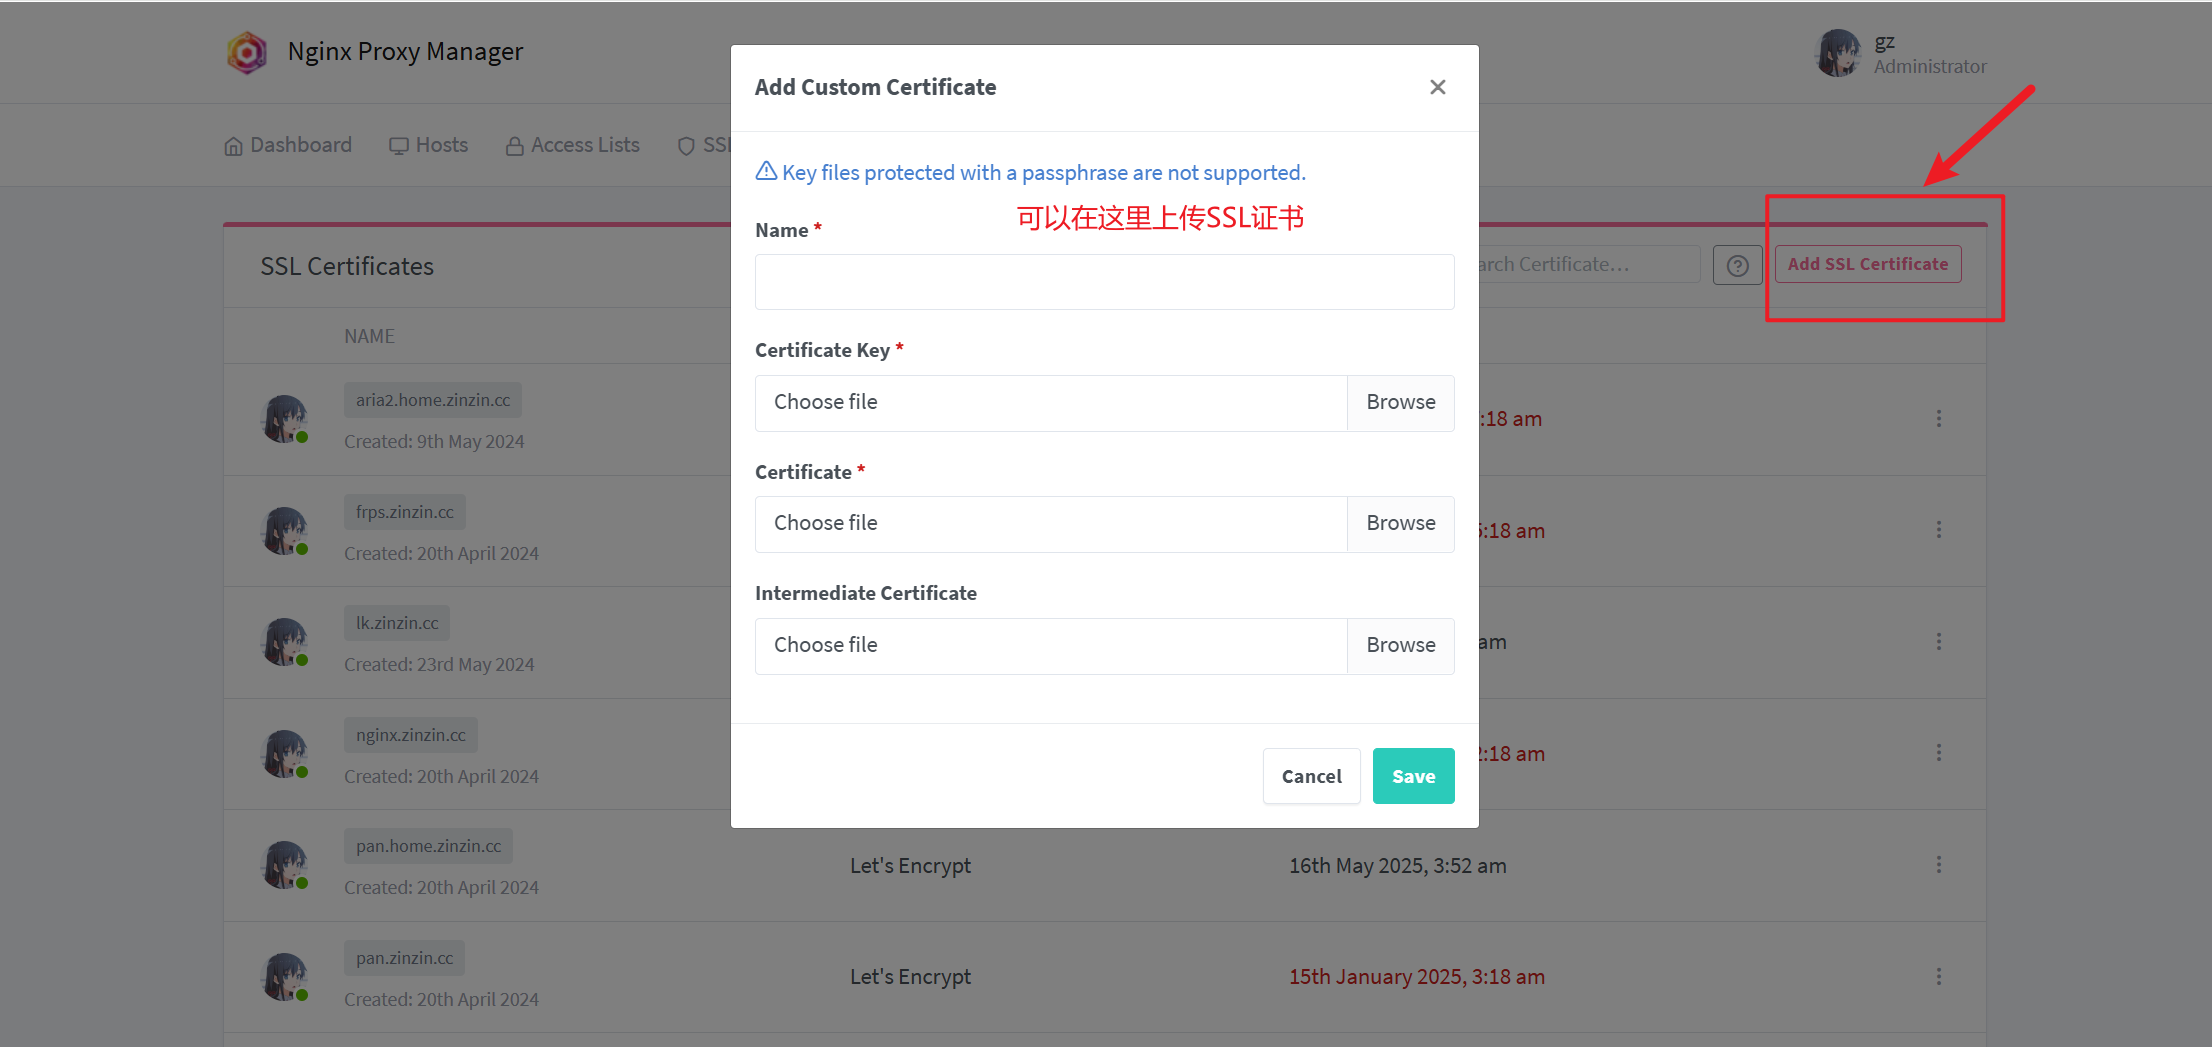
If automatic certificate issuance keeps failing with network errors on a mainland China server, you can manually apply for a certificate from your domain registrar and upload it to Nginx Proxy Manager.
Support & Share
If this article helped you, please share or support!